Overview
- Introduction
- How to install
- New control modes and navigation features
- Best practices (video tutorial)
- How to use the mission planning feature (video tutorial)
- Specifications
1. Introduction
A Doppler Velocity Logger (DVL) is a sensor that provides velocity measurements by sending sound waves towards the sea bottom and analyzing the echoes. With high precision velocity measurements relative to the seafloor, and measurements from the Internal Measurement Units (IMU), the control system can estimate where it is with the use of “Dead reckoning”.
When we know where we are, we can start to control the vehicle automatically based on velocity and position updates. This enables a new control mode called “Station Keeping”. The mode will maintain the ROVs position relative to the seabed, even with ocean currents or other external forces acting on the vehicle.
2. How to install the DVL
The WaterLinked DVL A50 is compatible with all Guest Ports (GP1, GP2, GP3).
In the box
The DVL kit box comes with 2xExtra o-rings, 2xZip-ties, 1xSelf Adhesive zip-tie mount, 1xMounting bracket with the DVL sensor and smart connector ready to install, and 1xBlueye steel skid.
Also included in the package: 4x top canister buoyancy for custom configuration (see more info further down the article).
Installation steps
- Power “off” the drone.
- Remove the battery cover.
- Unscrew the 3 screws that hold the side covers and open it.
- Remove the buoyancy so you can see the Guest Ports.
- Slide off the ballast weights.
- Slide in the DVL mounting bracket with the DVL attached. (Cable should be pointing forwards, legs should be aft).
- Clip the Steel skid onto the mounting bracket.
- Route the cable up the Guest port area.
- Check that the connector has o-rings and that they are clean and lubed.
- Select any of the 3 guest-ports and connect the cable with the screw. Do not tighten the screw too hard. Finger-tight is recommended to not damage the connector plugs.
- Use some small zip-ties to tidy up the cable routing.
- Put the buoyancy back on. If you are diving with multiple external equipment you may need to add the 4x top canister buoyancy (More info further down).
- Close the side covers. Make sure the cable is routed out through the bottom mount-slot before popping the side covers back on.
- Put the battery cover back on.
- That's it, due to our smart connectors, no configuration is needed.
Always check that the drone floats before diving! Seawater and freshwater have different densities, and front canister buoyancy is provided to compensate for the difference. Also if you are diving with multiple external equipments, you may need to add the additional top canister buoyancy.
3.New control modes and navigation features in the app


Station Keeping
Station keeping is easily activated by cycling through the auto-heading button. First, it activates auto-heading, then station keeping, and last, manual mode. With Station Keeping mode active, you can still drive the ROV like normal, and once you let go of the joysticks, it will stay where you left it automatically. If the control system loses its trust in the position estimate, it will automatically switch over to the “Auto-heading” control mode. Also “Station-keeping” can always be deactivated by pressing the auto-heading button (B).
Pro tip: If you are standing by in some current with Station Keeping activated, it is recommended to turn your heading towards the current. This will save battery consumption and give a longer operation time.
Auto-Altitude
The DVL also provides an altitude measurement, which is the distance in meters (or inches) to the sea bottom. The max altitude it can read is up to 50 m, (depending on the sea-bottom echo characteristics). With this measurement, we can keep a constant distance to the sea bottom, even though the water depth is changing.
There are numerous applications where it is desired to keep a constant distance while exploring an area. Imagine that you want to follow a pipeline with a 1-meter distance that goes from the shallow to a deeper area while recording. Or with a multi-beam equipped it is desired to know your distance to the bottom and keep this constant.
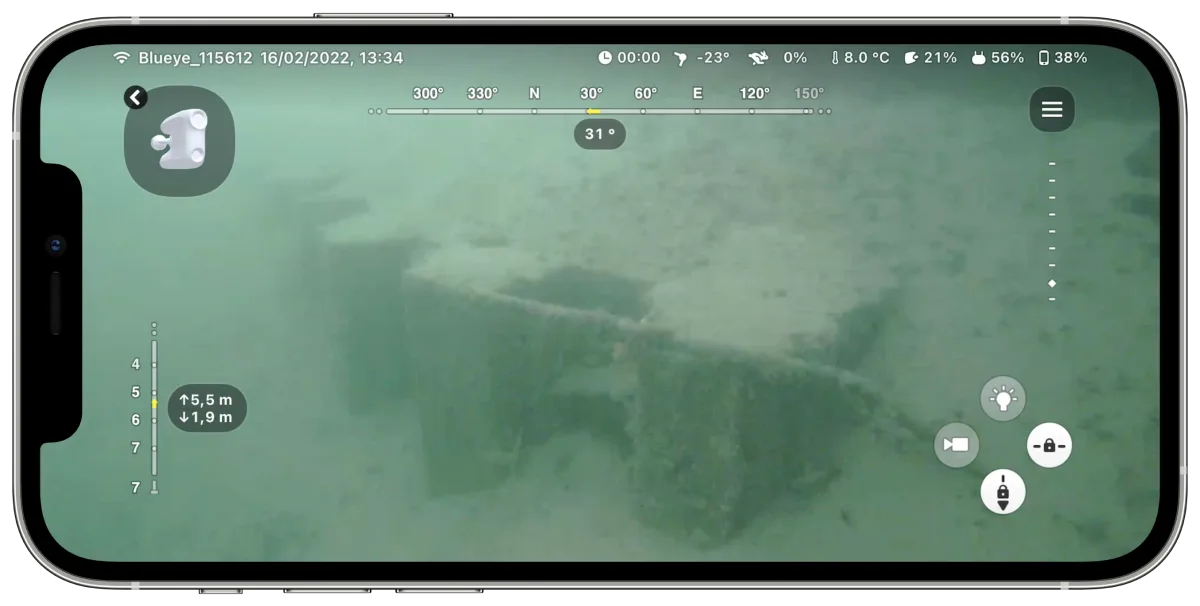
Once the altimeter has a valid reading, it will appear in the dive-view, right below the depth indicator. Once you have a reading, you can easily activate Auto-altitude by cycling through the Auto-depth button (A). With the Auto-altitude mode activated, you can still change the desired altitude the same way you do with Auto-depth. Thumb up to increase the distance, and down to get closer. If the altitude reading is invalidated, the drone will automatically switch to auto-depth. Then you just fly over to a new area where you get valid readings again and activate the mode.
The “Navigation” tab
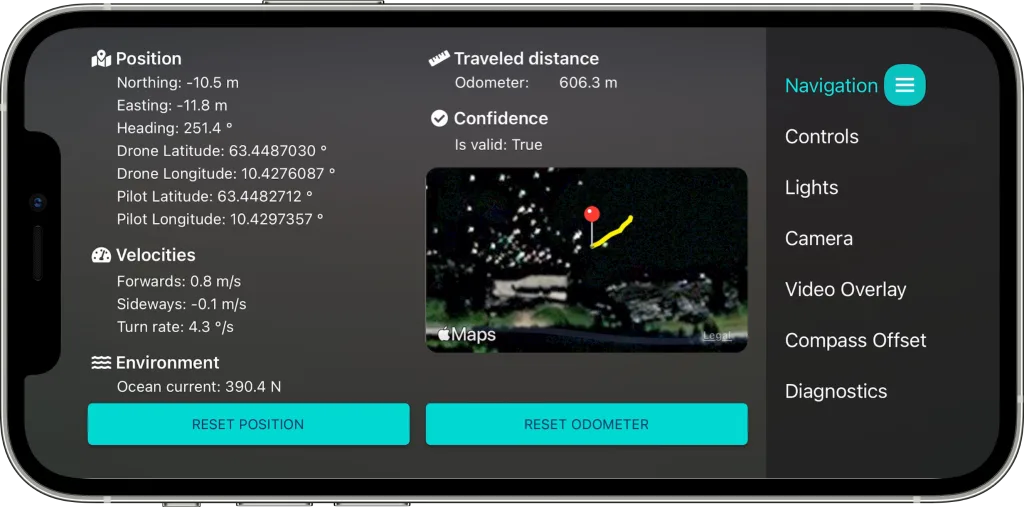
Once you have powered on the drone and started a dive, you can head over to the dive menu in the top right corner, and select the new tab called “Navigation”. Here you can reset the "Position estimate" and get readings on where you are relative to where you hit reset last time.
The Odometer
There is also a field called “Odometer”, which is measuring the traveled distance in any direction. This feature is particularly useful during a pipe inspection for instance. Then you can get an idea of how far down the pipe you found an area of interest. Or you can use it to approximate other distances you might need for navigating underwater. The Odometer also has a reset button that can be used to reset the accumulated distance, without resetting the position estimate.
Positioning with a DVL
Since the DVL is measuring the ROV's velocity, we can also estimate the unit's position if the starting point and heading is known. By utilizing the control device's (Phone/Tablet) GPS position and the current heading of the ROV (compass), we can get a position estimate in the global frame. This is what you see on the map in the Navigations tab below.
Pro tip: When the drone is in the water, find an area with low magnetic disturbances before you hit "Reset position" to get the best accuracy of the position estimate. Try to re-calibrate the ROV compass if the readings seems off.
Make sure your control device is close to the ROV when you hit "Reset position" since the control device GPS will be the starting point for the ROV-track.
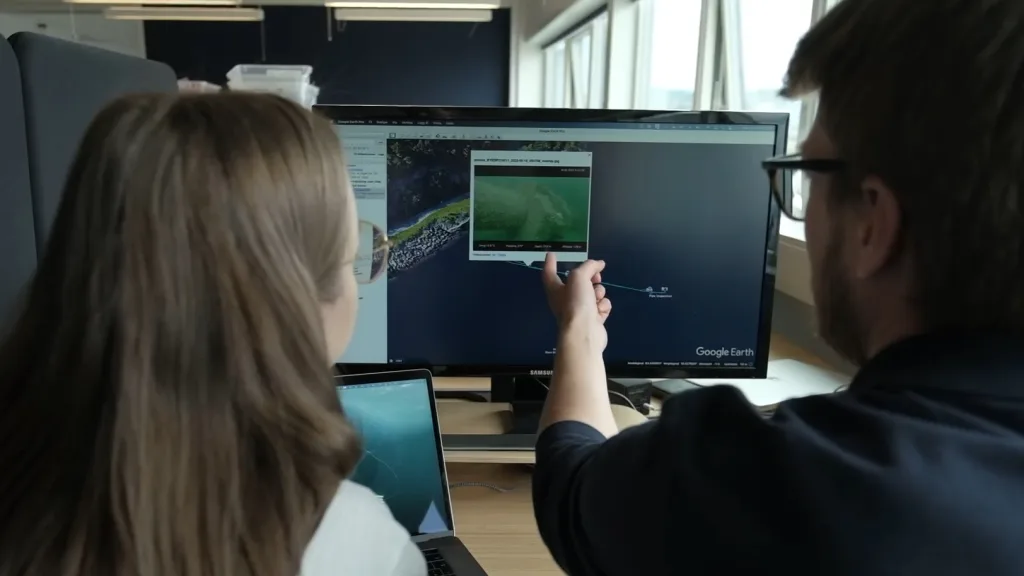
Export a position track to KML or KMZ
All dives with a DVL connected will have a position track in its dive log. Click end dive, transfer media files, and sync the log files. Find the relevant dive in the dives tab and open it. Now you'll see a map showing where you have been during that dive. All the images taken during this dive will also have the position data included automatically.
Find the share icon in the top right of the screen and select Share as KMZ. The app will now generate a file that contains the position track and the images captured during the dive. This file can then be shared via Airdrop, e-mail or in a text message. You can also open it directly in Google Earth if you have that app installed on your device. KML is also an option that does not contain the images and is therefore smaller in size typically.
The position will also be available in the CSV file, which can be generated in the same way. The CSV file will contain WGS84 Decimal degrees together with other relevant dive data.
4. Best practices (video tutorial)
5. How to use the mission planning feature (video tutorial)
Learn more about the Mission Planning feature in this support article.
Comments
0 comments